The Interest Calculator
Updated Apr 24th, 2025
Who is this guide for?
Accounts Users and Accounts Supervisors
The interest calculator is a tool designed to enable you to track interest due on monies held in client’s accounts. This guide will show you how to use it
Before the Interest Calculator can work a Supervisor level user must set up the Interest Rates and Bands in the Supervisor area of Osprey.
Set up your interest rates, bands and accrual periods
Navigate to the Supervisor area and select Financial Setup. Then click on Interest Rates/Bands. Now choose to Add Band.
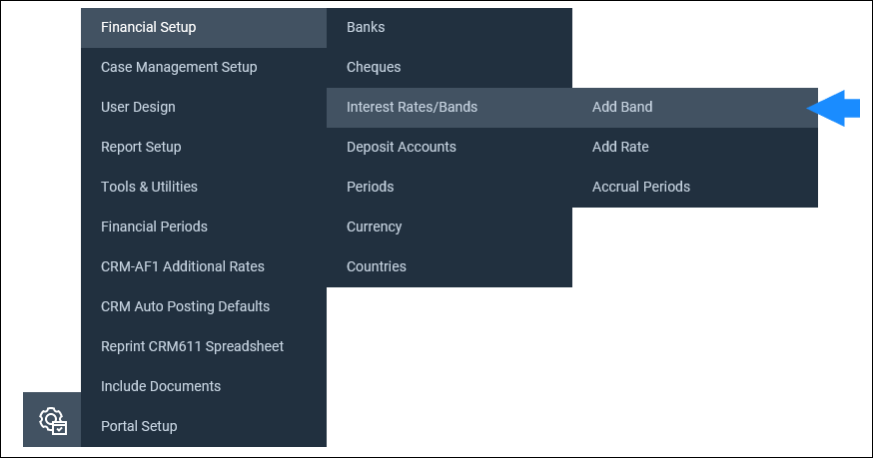
Enter the information according to the details received from your bank including a lower and an upper bound, and then click Save.

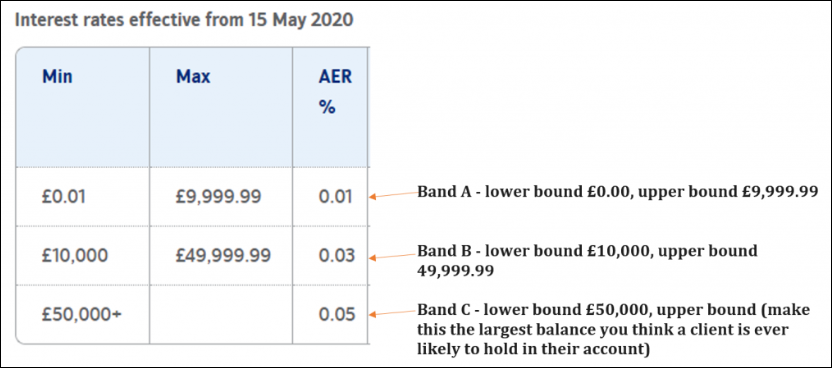
For example, if you have a table which looks like the below, you would need to add 3 bands:
We can now select Add Rates.
Enter the start date and interest rate, then select the band it applies to by ticking in the relevant box. You can add as many different rates and start dates to a band as your bank have supplied you with. Osprey will calculate interest on each ledger transaction based on the rate at the time of the posting date.
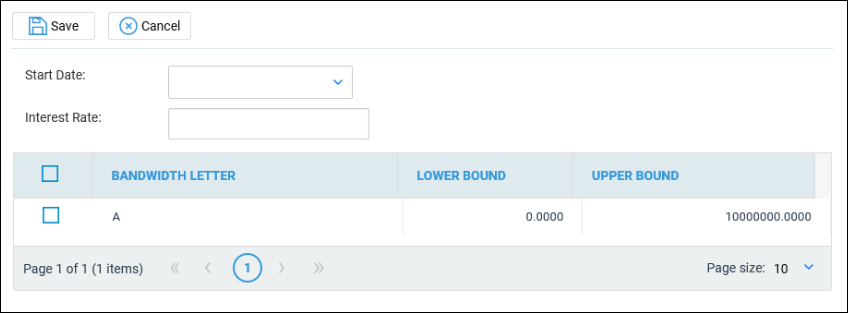
Click Save to keep your changes.
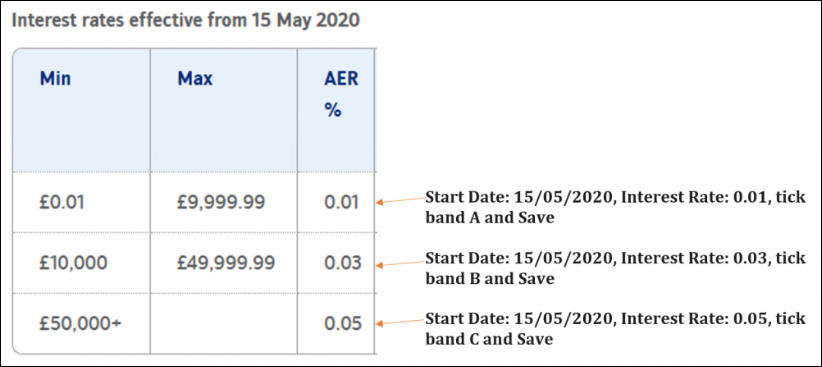
E.g. In the example below, we would add 3 different interest rates:
Now, you will need to add an accrual period. Accrual periods are used by the system to decide when to calculate the interest, and are stored as a number of months. Navigate to Supervisor > Financial Setup > Interest Rates/Bands/Accrual Periods and click New:

- Bank interest is paid monthly – enter the start date (if this is the first accrual period you are adding, enter your earliest interest rate start date, otherwise enter the date when this changed), and 1 in the Accrue Period box.
- Bank interest is paid quarterly – enter the start date (if this is the first accrual period you are adding, enter your earliest interest rate start date, otherwise enter the date when this changed), and 3 in the Accrue Period box.
- Bank interest is paid annually – enter the start date (if this is the first accrual period you are adding, enter your earliest interest rate start date, otherwise enter the date when this changed), and 12 in the Accrue Period box.
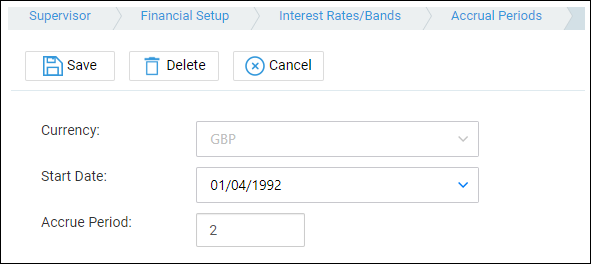
Click Save when you are done.
Calculate interest on a single matter
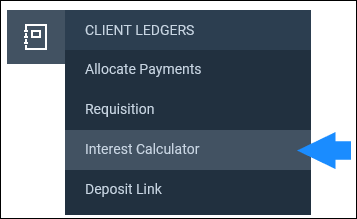
Navigate to Client Ledgers and select the Interest Calculator.
The postings are listed down the page.

Tick the Range box on the first and last postings you want to include, then click the Set Selection Range button to tick all the postings in between.
N.B. Do not include any “interest paid” postings in your calculation.
Select the end date for the calculation, interest will be calculated on the period from the first posting date to the entered End Date.
The option for Delay allows you delay the date at which the entry was received, so can be used to in effect change the date at which you received a cheque.
Add the rate at which tax is to be paid on this interest, then click the ‘Calculate Interest’ button.

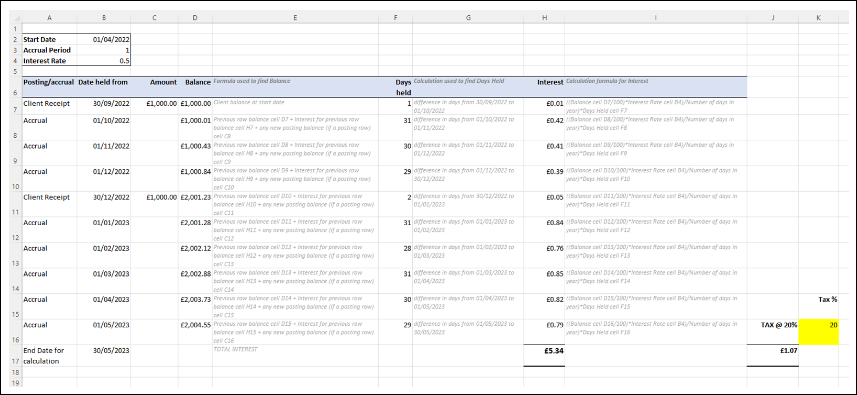
The below screen will now appear.
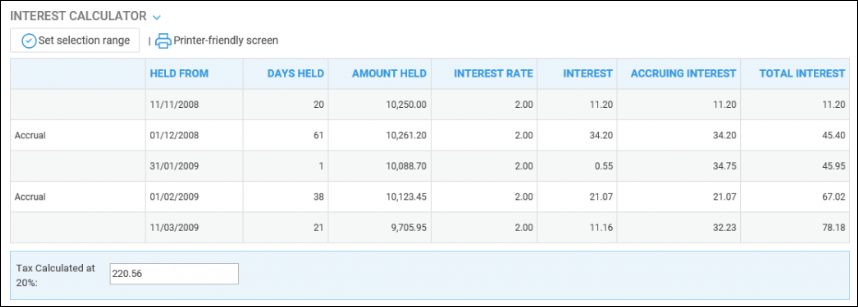
This page will display relevant information in columns and rows. There is a box at the bottom of the table that displays the total amount of tax payable. You can then make a note of the Total Interest to separately post to the Client Ledger at a later point.
If you click the Printer-Friendly Screen option, a new window will open allowing you to print a copy of the results in an easily readable format. Remember to close this window after printing.
Calculate interest for all matters
Please note that the total batch interest calculated in Osprey for all clients and matters will not match the total interest paid to you by your bank. This is because your bank will pay interest on the whole amount in your client bank account, which will likely be at a higher rate of interest than each individual client ledger will attract, given that the individual matter balances will sit in a lower band.
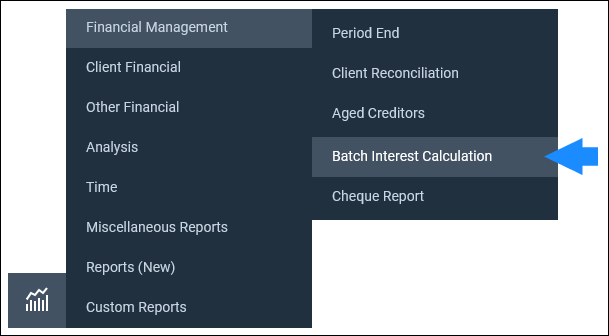
There is also a report available to show the interest due on all matters. Under the Reports tab, navigate to Financial Management and then select Batch Interest Calculation.
This report allows you to calculate interest due to all clients according to the filters you have specified. It does not post the interest on the accounts, but just lists the interest due for each transaction on each client’s ledger (along with a total due at the end). You will need to post the interest separately.
You have several filter options on this report:
Work Type – Tick this box if you want to show only one or a selection of work types. Once the box is ticked all work types marked as In Use will appear. You can then tick each one that you want to report on. If you want to see all work types, do not tick the work types box and it will produce all work types.
Fee Earner – Choose the fee earner whose clients you want to calculate interest for.
Limit – Enter the minimum interest amount to calculate. For example if £10 is entered here, only matters where the interest held is greater than £10 will be shown.
Currency – select the currency you wish to report on.
Date Filters – Enter the start and end dates that you wish to calculate interest for.
Once filtered, select Run to open your report. You can export these results to Excel or a PDF should you wish to.

Understand how interest is calculated
A note on Accrual Dates
Accrual dates are the dates on which your bank accrues interest. If your bank pays interest on the 1st of every month, set your Accrual Date Start Date to the first day of the month in the earliest period in which you have transactions in Osprey. Accruals will then be shown on your interest calculation as per the examples below:
- Start date 1/2/2020, accrual period 2 – this means that interest is accrued on a 2 monthly basis starting from 1/2/2020, so your accrual dates will be 1/4/2020, 1/6/2020, 1/8/2020 etc. If your first posting was on 25/3/2021 the next accrual date would be 01/04/2021.
- Start date 12/10/2019, accrual period 3 – this means that interest is accrued on a 3 monthly basis starting from 12/10/2019, so your accrual dates will be 12/01/2020, 12/04/2020, 12/07/2020 etc. If your first posting was on 10/2/2023, the next accrual date would be 12/4/2023.
The next accrual is the next date found after the posting date based on the accrual period start date and frequency.
When running an interest calculation on a ledger, the following explains how this calculation is made.
- Get Start Date (date of first posting selected in the interest calculation screen) and End Date (End Date for Calculation as set in the interest calculation screen).
- List all client postings selected in the interest calculation screen. If there are several postings on a particular day which will affect the client balance, these are summed per day to find the day’s balance e.g. if you have posted a client bank receipt of £1000 and then paid out £300 as a cost transfer to cover fees on the same day, the balance would be £700.
- List all rate changes and accrual dates within the Start to End Date range.
- Order all of the above by posting date, with Accruals and Rate Changes before transaction balances where they are on the same day.
- Calculate running balance, and the number of days each balance has been held. This is calculated on posting date made to next accrual/posting date.
- Interest is calculated as follows:
(((Running Balance/100)*Interest Rate)/Days In Year)*Days Held
Posting Interest
Usually, bank interest from your client account is paid by your bank into your office account. You can record these interest payments on a nominal ledger by posting a receipt for the amount of interest received. To transfer the amount for one matter, you can use a Transfer to Nominal posting on the client ledger, using the nominal for interest payments received, this will transfer the interest from the nominal into the office column of your client’s ledger. Next, make a Cost Transfer Office to Client and transfer the amount into the client column.

If you perform any additional interest calculations on this matter, be sure to exclude any interest payment postings however.

ERROR: Not Enough Band / Rate Data Set Up?
You may receive the warning above when trying to calculate interest. This can mean one of a few things.
- Your lower bound of Band A is set to something other than 0, and the balance column in the interest calculator screen dips to 0 on one of the transactions. Simply amend your Band A lower bound to 0 to rectify.
- One of the balances on the ledger falls outside of any of the lower / upper bound ranges set up against your bands. Check that there are no “gaps” in your interest bands, all values from 0 (lower bound of Band A) to the upper bound of your final band should be accounted for.
- One of the balances on the interest calculator screen is overdrawn. Correct the posting order or exclude this item from the calculation.